Oct 31 2016

#aspnetcore #MvcControlsToolkit new 1.1.4 version ready

Category: Francesco @ 23:43

Today we released the new 1.1.4 version of the  asp.net core Mvc Controls Toolkit, with new amazing advanced controls: immediate grids, batch grids, pagers, detail forms, auto-complete, and widget fallbacks for all Html5 inputs, type=”color” included. Start playing live with them! and then:  Download example project and install the toolkit on it (perform just steps 1-4, since startup class and Layout view are already configured).

All controls are templated, and templates may be changed both locally to a single instance, locally to a whole controller, and globally. It is the first controls suite where complex controls like templated edit-in-line controls are specified completely with TagHelpers. It contains also customizable ready to use Crud controllers and repositories.

In a short time a full featured documentation web site and a lot of tutorials and video, in the meantime, please use the explanation in the live examples web site and the example project to figure out how to use the core toolkit.


enjoy and stay tuned!

Francesco

Tags:

Jul 17 2016

Available Asp.net core version of the Mvc Controls Toolkit Live Examples!

New 1.0.1 bugs fix release of the Mvc Controls toolkit! Available also Live Examples at this link!

Enjoy!  & Stay tuned

In a short time ajax update server grid and batch update server grid

Francesco

Tags: , , , ,

Jul 1 2016

Ap.net Core 1.0.0 RTM Version of the Mvc Controls Toolkit Ready

Category: Asp.net core | WebApi | MVC | Htnl5 fallback | Asp.netFrancesco @ 20:00

The first Asp.net Core 1.0.0 RTM release of the Mvc Controls Toolkit is available for download! This is the link that explains how to install it, while a starting example may be downloaded here. Pay attention! You must follows all installation steps also for running the example, since the example among other things has also the purpose of becoming familiar with installation, and configuration stuffs.

Enjoy!  & Stay tuned

In a short time tutorials, live examples, and a complete documentation web site

Francesco

Tags: , , ,

Jun 25 2016

Ap.net Core Rc2 Version of the Mvc Controls Toolkit Ready

Category: Asp.net core | WebApi | Htnl5 fallback | MVC | Asp.netFrancesco @ 02:40

The first Asp.net Core Rc2 release of the Mvc Controls Toolkit is available for download! This is the link that explains how to install it, while a starting example may be downloaded here. Pay attention! You must follows all installation steps also for running the example, since the example among other things has also the purpose of becoming familiar with installation, and configuration stuffs.

Enjoy!  & Stay tuned

In a short time tutorials, live examples, and a complete documentation web site

Francesco

Tags: , , ,

Jun 3 2016

Will Google Angular2 survive to Google own Polymer?

Category: JavaScript | TypeScriptFrancesco @ 00:56

A couples of weeks ago Google presented Polymer features at I/O 2016. In a few words Polymer is about Web Components. Web Components (also known as Custom Elements) are part of the Html and Dom specifications. They are a way of encapsulating both JavaScript, Html templates and Styles within reusable components. Everything is inside the component is not accessible from the external world. So for instance, component internal styles and JavaScript do not affect the remainder of the Web Page. Custom elements are associated with custom Html tags,so the developer may use them, by simply writing the custom tag. Since custom tags may contain other Html inside them Web Components may be nested. So for instance, you may define a “grid” custom element that may contain custom row or column templates inside of it..

At moment browser support for Web Components is limited basically to Opera and Chrome, but there are hundreds of polyfills that simulate them.

Polymer furnishes both:

  • A polyfill for browser not supporting Web Components
  • A complete set of already implemented components
  • Various tools to help you build web component based applications.

Angular team declared that they will end up adopting Polymer Web Components inside Angular. Since there is an overlap between Web Components and Angular custom elements, it appears that most of Angular UI logics will end up being completely substituted by Polymer Web Components.

This transition will be driven by the support provided also by other Browser to Web Components. In fact, with native browser support Web Components will over-perform slower simulated Angular UI constructs.

To say the truth, also polyfilled Web Components are faster than their equivalent Angular constructs, because normally Angular2 must visit the whole Model behind the page to perform changes detection each time an event occurs!

Thus for instance if you change a value in a grid with 10.000 items, it must check all all 10.000 items looking for changes that might affect the DOM. Luckily, if you use either Immutable objects or observables it is able to restrict changes detection just to the path within the overall page Model that contains the changed property. Please refer to this article for more details on Angular changes detection,and on how immutable objects and observables help the process.

However, this means you can’t use plain JavaScript objects as they are returned by the server, but you have to copy them into ad-hoc designed objects before binding them to the DOM .This was the main criticism moved by Angular sustainer against knockout.js, because of knockout.js usage of observables!

But why Angular1  started with plain JavaScript object and then moved toward immutable objects and observable? Simple! They hoped they might have improved performance thanks to the browser support of the forthcoming Object.observe api!

For the ones that never heard about Object.observe, changes in standard plain JavaScript objects should have automatically caused notifications to functions registered with Object.observe. Unluckily, Angular performance when using Object.observe was unacceptable! In a few words the reason of this unacceptable performance was the too many notifications coming from modified objects. In fact each event may cause a chain reaction of object modifications which in turn causes an unacceptable number of notifications being sent to  the Angular changes detection engine.

Similar problems with other software caused the removal of the Object.observe api from Chrome and  other browsers, and their consequent removal form the initial “standard” proposal.

Summing up, after this bad experience Angular team was forced to move to other techniques to improve performance, i.e.: immutable objects and observables.

So, from one side we have an UI based  on Polymer that has the following advantages:

  1. Based on a W3C standard
  2. Efficient, because in a short time all main browsers should support natively Web Components
  3. Modular, easily integrable with other frameworks, and not opinionated, since Polymer components are not tied to Polymer,but are completely independent chunks of software you may use in any application.The only constraint is that a polyfill be provided for browser not supporting Web Components yet. However, this constraint is going to be removed in a short time since Web Components will be soon implemented by all major browsers.

On the other side we have Angular:

  1. A complete framework, containing everything is needed to develop a client-techniques based Web Application, from User Interface  to client-server communication, and Dependency Injection. However, it is opinionated and quite difficult to integrate with other frameworks.
  2. Slow as compared to native Web Components and with no hope to overcome this gap.
  3. Forces the usage of Observables and/or Immutable objects in performance critique applications. True,that the usage of Immutable objects is expected to grow (give a look to this post for a quick introduction to JavaScript Immutable objects), but being forced to use them, for sure, makes life more difficult to developers in any case. Moreover, the immutable objects  paradigm doesn’t fit all situations,and for sure is not adequate for complex big business objects.

We might expect that with the increasing native support for Web Components Angular will be forced to integrate Polymer style web components,  till an almost complete substitution of its User Interface. Now the point is, is it worth using Angular once its UI stuffs have been substituted with another framework?

For sure a lot of people will continue using it, since it will continue being a “glue” that keeps together various client-side technologies, offering everything is needed to implement a client-based application. It will continue being attractive for companies that need its developers be guided by the “pre-defined style”  of an opinionated framework: a kind of guarantee all developers conform to a common universally accepted “standard”.

However, a lot of freelancers and company with a stronger “governance” of their teams, or company was strength is flexibility, will prefer implementing their applications by assembling modules from different authors/frameworks. Thus choosing each time the tools the more adequate to their current needs: say Polymer for UI,but tools from different authors for client/server communication and routing. In fact notwithstanding  the need of some companies for a complete  omni-comprehensive framework the community is preferring always more self-contained modules easy to assemble with other technologies.

Anyway while its difficult to forecast in detail the future of Angular, for sure it’s worth to start learning Polymer, and/or similar Web Component based frameworks like for instance React.js!

Have fun with Web Components!

Francesco

Tags: , , , ,

May 24 2016

Html enhancements, processing, and fallback: how to organize all of them?

Category: Htnl5 fallback | TypeScript | JavaScript | Asp.netFrancesco @ 02:44

I already analyzed and classified JavaScript techniques for Web Applications in a previous series of posts. In this post I’ll propose a solution to the main problems associated with the enhancement of Html with jQuey plug-ins or with other Html post-processors.  The solution I describe here is implemented in a JavaScript library available on both bower and npm registry

But let start the story from the beginning!

Html post-processors add Widgets or further functionalities (like, for instance drag and drop based interactions). that  either are fallbacks of features not supported by the browser, or that are completely new features (features not supported by any browser and not mentioned in Htnl5 specifications).

Since Html enhancements depend strongly on browser capabilities and on the usage of JavaScript they can’t be processed on the server side with some smart server side template engine, but must be processed in the browser itself.

So there are just two possibilities:

  1. Using client templates that adapt to the browser capabilities
  2. Performing an Html post-processing, that adds widgets and/or features.

If we don’t use an advanced JavaScript framework like Angular, React.js, Knockout, or any other client-templates based framework we are left just with the post-processing option. This is the famous jQuery plug-ins way, where we enhance static Html with by selecting target nodes with jQuery css-like selectors: basically a kind of super-css with no limits on the effects we may achieve.

Also when  we use a client-side template engine, often, we are forced to use Html post-processing techniques! Why? Simple, just because often the functionality we need is not implemented in the chosen client-side framework, so we are forced to use some jQuery plug-in, in any case. This is very common, since there are several mutually incompatible advanced client side frameworks, and their average life is quite short (they either die, or evolve in a partially incompatible way), so the community hasn’t enough time to produce a complete set of useful libraries, while, on the other side, jQuery plug-ins always survive and increase since they may be easily adapted to any framework.

Moreover, Html post-processing may be applied also to the output of already existing modules and for this reason, often, it is the only viable option also when using client-side templates. Suppose, for instance, you want, to apply not supported Html5 input fallback to existing Knockout.js, or Angular.js client controls, you have just two options, either rewriting all controls to include the fallback feature, or applying somehow an Html post-processing.

Summing up, unluckily, Html post-processing still has a fundamental role in Web Applications development. I said, “unluckily”, since while all new advanced client-side frameworks were conceived to improve the overall quality of the client side code, the html enhancement/post-processing paradigm suffers of well known problems;

  1. .While initial page content is processed automatically, dynamically created content is not!  So each time we receive new Html as a result of an Ajax call, or as a result of the instantiation of client-side templates, we need to apply manually all transformations that were applied to our initial static Html, in the same order!
  2. Transformations must be applied in the right order, and this order is not necessarily the order implied by the JavaScript file dependencies. For instance, say module B depends on module A, so A script must come before B script, However, in turn, this implies that all transformations defined in A are applied before the ones defined in B,…but we might need that B transformations are applied before A transformations.
  3. Usually transformations are applied on the document.ready event so it is very difficult to coordinate them with content loaded asynchronously

Summing up, all problems are connected with dynamic content, and with operations timing, so after, analyzing the very nature of these problems, I concluded they might have been solved by creating a centralized register of all transformations to apply and by organizing the overall processing into different stages.

Transformations register

If we register all transformations in a centralized data structures then on one side we may decide with no other constraints their order of application, and on the other side we may apply all transformations, in the right order to each chunk of Html with a single call to the an “apply-all” method of the centralized data structure.That “apply-all” method might be applied at page load after all needed asynchronous modules (if any) have been loaded,and each time new dynamic content is created.

Invoking, the “apply all” method is easy also in most of the client framework based on client templates, that usually allows the application of some processing to all dynamically created content, 

3 Different stages

The complete freedom in choosing the right order of application isn’t enough to deal with several interconnected cooperating modules.In fact, the overall relative order constraints network might admit no solution! Moreover, also when relative order constraints may be satisfied the addition of a new module might break the stability of the application. In a few words: application order constraints undermine software modularity and maintainability.

So we need to reduce relative order constraints by removing all order constrains that depend on the way the modules are implemented and interact and not on the transformations very nature.

For instance if a module applies a validation plug-in while another module performs not supported Hrml5 input fallbacks the very nature of these two transformation implies that the validation plug-in must be applied after the fallback, since it must act on the already transformed input fields (the original ones are destroyed).

However, if modules A, B, C, D,  furnish further features to the main transformation applied by M, it would be desirable that there are no order constraints among them. Imagine, for instance, M transforms some Html tables into grids, while A, B, C, D apply additional features like for instance grouping, sorting, and virtual scrolling.

Order constraints among A, B, C, D may be avoided only if they act in a coordinated way, by exploiting extension points provided by M. In other terms when, A, B, C, D transformations are registered, instead of operating directly on their target Html, they should connect to extension points of M that then applies all of them properly and at the right time during the Grid construction.

If A, B, C, D were explicitly designed as extensions of M the designer would take care of their coordination, but what if we are putting together software from different authors?

We must build wrappers around them, and we must use a general framework that takes care of the coordination problem.  A three stages protocol may do the job, and ensure transformations are applied efficiently:

  1. Options pre-processing. During this stage each module connects to extension points of another module it is supposed to extends.
  2. Options processing. during this stage each module configure itself based on its options and extension. Since, this stage is executed just once all processing that doesn’t depend on the nodes to transform should be factored out here. This way it will be executed just once, and not, on each transformation call.
  3. Actual node transformation. This is the step we previously called “apply all”. It is automatically invoked on the initial content of the page, and then it must me invoked on the root of each newly created content.

All above steps are applied in sequence (all modules perform 1, then all modules perform 2, etc.)

Since, module coordination, is handled in step 1 there is no need to impose order constraints to ensure coordination of cooperating modules. This way order constraints are minimized. Only the “natural” constraints easy to figure out just by the definition of each transformation, should remain.

In the software implementation of the above ideas, called mvcct-enhancer, for registering a module we specify 3 functions each executing one of the threes stages described above. All module options are specified within an overall options object where each module has its own sections (i.e properties). Connections, to other modules extension points take place by adding option values (that may be also functions) in the options section of the target module. The functions that process steps 1 and 2 receive just the overall option object as argument, while the actual transformation function receives two arguments, the root node of the chunk to transform and a bool set to true only for the initial processing of the page static content.

mvcct-enhancer has functions for applying all transformations on a dynamic node, for initiating the three steps protocol, and for waiting for async JavaScript loading. It has also a basic Html5 input support detection and fallback module that has extension points to add jQuey widgets.

We implemented also a module that provides widget extensions based on Bootstrap, called bootstrap-html5-fallback. It is a good example on how to build wrappers around existing software to use it with mvcct-enhancer. In fact the the main purpose of mvcct-enhancer is to provide a framework for coordinating several already existing modules written by different authors, at a price of writing a few lines wrappers.

That’s all for now!

In the next post we will see an example of how to use mvcct-enhancer to provide, Html5 fallback, and globalized validation to Asp.net Core Mvc with the help of the Asp.net core new version of the Mvc Controls Toolkit.

Francesco

Tags: , , , ,

Nov 20 2015

New Mvc6 Controls Toolkit

Category: TypeScript | JavaScript | MVC | Asp.netFrancesco @ 04:50

Web development changed dramatically in the last few years and the Mvc Controls Toolkit team run after all changes to offer a state of the art toolkit, but now it is time to redesign the whole toolkit from the scratch! JavaScript world evolved, and web applications reliy always more on client side techniques. New JavaScript frameworks appears and evolve quickly, thus the need of a better separation between server side and client side world. The new Mvc 6 Controls Toolkit answers to these new Web Development boundaries are: TypeScript, a better separation of JavaScript world coordinated with server side C# code through trans-compilation of C# classes and attributes, native support of the most common client side frameworks like Angular.js, and Knockout.js, and open support for other client side framework by means of providers,…and more!


Please leave you feedback on the specifications of the new Mvc 6 Controls Toolkit!


Francesco

Tags: , , , , , , ,

Oct 31 2015

Building Complex Controls with Asp.Net MVC 6 TagHelpers

Category: Asp.net | MVCFrancesco @ 04:09

Asp.Net Mvc 6 proposes a new option to Html Helpers: Tag Helpers. Tag Helpers are similar to Html Helpers but they use an Html tags – like syntax. Basically, they are custom tags with custom attributes that are translated into standard Html tags during server side Razor processing.

They are somehow similar to Html5 custom elements but they are processed on the server side, so they don’t need JavaScript to work properly and their code is visible to search engine robots. Html 5 elements are not fully supported by all main browsers, but they are somehow simulated on all browsers by several JavaScript frameworks, like, for instance, Knockout.js.

Thus, one might plan to build TagHelper based Mvc controls that create their final Html either on the server side or on the client side with the help of a JavaScript framework that supports custom elements. More specifically, the same Razor View might generate either the final Html or some custom elements based code to be interpreted on the client side by a JavaScript framework, depending on some settings specified either in the View itself, or in the controller, or in some configuration file. Both server and client side generation have their vantages and disadvantages(among them server controls are visible to search engines, but client controls are more flexible), so the possibility to change between them without changing the Razor code appears very interesting.

This post is not a basic tutorial on Tag Helpers, but a tutorial on how to implement advanced template based controls, like grids, menus, or tree-views with TagHelpers. An introduction to TagHelpers is here; please read it if you are new to custom Tag Helpers implementation.

This tutorial assume you have:

  1. A Visual Studio 2015 based development environment. If you have not installed VS 2015, yet, please refer to my previous post on how to build your VS 2015 based development environment.
  2. Asp.Net 5 beta8 installed. Instructions on how to move to beta8 may be found here.


Template Based Controls

Complex controls like TreeViews and Grids use templates to specify how each node/row is rendered. Usually, they have also default templates, so the developer needs to specify templates just for the “pieces” that need custom rendering. For instance, in the case of a grid a developer wishing to use the default row template might need to specify templates just for a few columns that need custom rendering. Controls may allow several more custom templates, such as a custom pager template, a custom header template, a footer template and so on.

In this tutorial I’ll show just the basic technique for implementing templates with TagHelpers. For this purpose we define a simple <iterate>…</iterate> TagHelper that instantiates a template on all elements of an IEnumerable. Moreover, all inputs field created in the output Html will have the right names for the Model Binder to read back the IEnumerable when the form containing the <iterate> tag is submitted (see here if you are new to model binding to an IEnumerable).

The Test Project

Open VS 2015 and select: File –> New –> Project…
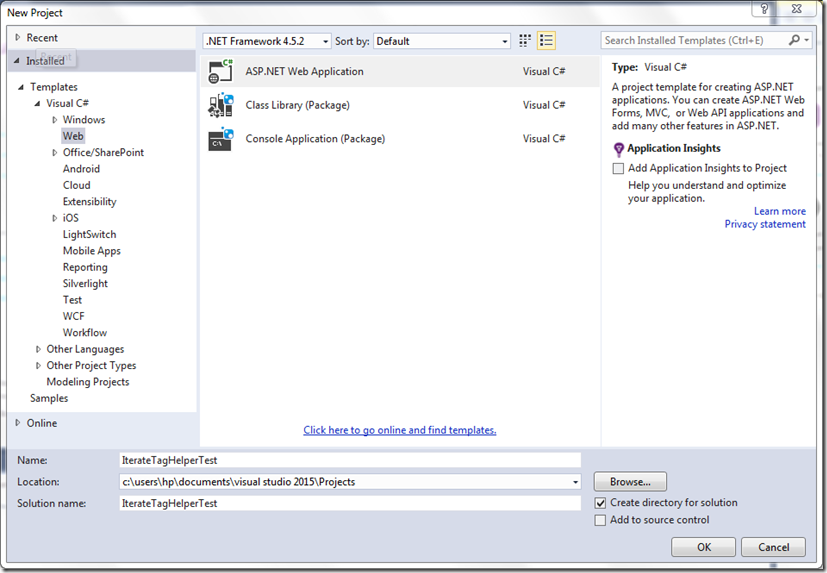
Project

Now select “ASP.NET Web Application” and call the project “IterateTagHelperTest” (please use exactly the same name, otherwise you will not be able to use my code “as it is”  because of  namespace mismatches).
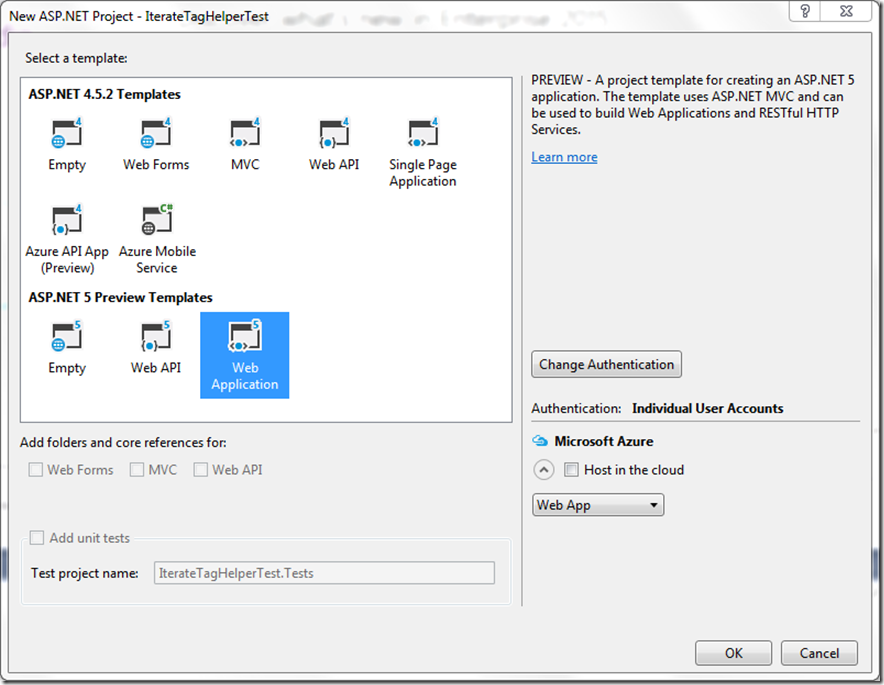
MVC6

Now choose “Web Application” under “ASP.NET Preview Templates”, and click “OK” without changing anything else.


We will test our new TagHelper with a new View handled by the HomeController.

We need a ViewModel, so as a first step go to the “ViewModels” folder and add a child folder named “Home” for all HomeController ViewModels.

Then add a new class called “TagTestViewModel.cs” to this folder.

Finally, delete the code created by the scaffolder and add the following code:

  1. using System;
  2. using System.Collections.Generic;
  3. using System.Linq;
  4. using System.Threading.Tasks;
  5.  
  6. namespace IterateTagHelperTest.ViewModels.Home
  7. {
  8.     public class Keyword
  9.     {
  10.         public string Value { get; set; }
  11.         public Keyword(string value)
  12.         {
  13.             Value = value;
  14.         }
  15.         public Keyword()
  16.         {
  17.             
  18.         }
  19.  
  20.     }
  21.     public class TagTestViewModel
  22.     {
  23.         public IEnumerable<Keyword> Keywords { get; set; }
  24.     }
  25. }

It is a simple ViewModel containing an IEnumerable to test our iterate TagHelper.

Now move to the HomeController and add the following using:

  1. using IterateTagHelperTest.ViewModels.Home;


Then add a Get and a Post action methods to test our TagHelper (without modifying all other action methods):

  1. [HttpGet]
  2. public IActionResult TagTest()
  3. {
  4.     return View(new TagTestViewModel
  5.     {
  6.         Keywords = new List<Keyword> {
  7.         new Keyword("ASP.NET"),
  8.         new Keyword("MVC"),
  9.         new Keyword("Tag Helpers") }
  10.     });
  11. }
  12. [HttpPost]
  13. public IActionResult TagTest(TagTestViewModel model)
  14. {
  15.     return View(model);
  16. }


Now go to the Views/Home folder and add a new View for the newly created action methods. Call it “TagTest” to match the action methods name.

Remove the default code and substitute it with:

  1. @model IterateTagHelperTest.ViewModels.Home.TagTestViewModel
  2. @{
  3.     ViewBag.Title = "Tag Test";
  4. }
  5.  
  6. <h2>@ViewBag.Title</h2>

We will insert the remainder of the code after the implementation of our TagHelper. Now we need just a title to run the application and test that everything we have done works properly.

Before testing the application we need a link to reach the newly defined View. Open the Views/Shared/_Layout.cshtml default layout page and locate the Main Menu:


  1. <ul class="nav navbar-nav">
  2.     <li><a asp-controller="Home" asp-action="Index">Home</a></li>
  3.     <li><a asp-controller="Home" asp-action="About">About</a></li>
  4.     <li><a asp-controller="Home" asp-action="Contact">Contact</a></li>
  5. </ul>


And add a new menu item for the newly created page:

  1. <ul class="nav navbar-nav">
  2.     <li><a asp-controller="Home" asp-action="Index">Home</a></li>
  3.     <li><a asp-controller="Home" asp-action="About">About</a></li>
  4.     <li><a asp-controller="Home" asp-action="Contact">Contact</a></li>
  5.     <li><a asp-controller="Home" asp-action="TagTest">Test</a></li>
  6. </ul>

Now run the application and click on the “Test” top menu item: you should go to our newly created test page with title “Tag Test”.

Now that our test environment is ready we may move to the TagHelper implementation!

Handling Template Current Scope

A template is the whole Razor code enclosed within a template-definition TagHelper. For instance, in the case of a grid we might have a <column-template asp-for=”….”> </column-template > TagHelper that encloses custom column templates, a <header-template > </header-template > that encloses custom header templates, and so on. Since our simple <iteration> TagHelper,  includes a single template we will take the whole <iteration> TagHelper content as template. In the case, of more complex controls the main control TagHelper  usually includes several children template-definition TagHelpers.

According to our previous definition, each template may contain both: tags, Razor instructions and variable definitions. Since the same template is typically  called several time  we need a way to ensure that the scope of all Razor variables is limited to the template itself. Moreover, all asp-for attributes inside the template must not refer to the Razor View ViewModel but to the current model the template is being instantiated on.

Something like:

  1.      <iterate asp-for="Keywords">
  2.          @using (var s = Html.NextScope<Keyword>())
  3.          {
  4.              var m = s.M;
  5.              <div class="form-group">
  6.                  <div class="col-md-10">
  7.                             <input asp-for="@m().Value" class="form-control" />
  8.                  </div>
  9.              </div>
  10.          }
  11.      </iterate>

should do the job. Where Html.NextScope<Keyword>() takes the the current scope passed by the father <iterate> TagHelper put it in a variable, and makes it the active scope. s.M() takes the current model from the current scope. s.M must be a function to avoid that m is included in the input names(Keyword[i].m.Value, instead of the correct Keyword[i].Value).

When the template execution is terminated the scope object is disposed, and its dispose method removes it form the top of the scopes stack, and re-activate the previously active scope, if any(we need a stack, because templates might nest).

The <iteration> TagHelper  takes the list of Keywords thanks to its asp-for=”Keywords” attribute, and call the template on each object of the list:

  1. foreach (var x in model)
  2. {
  3.     TemplateHelper.DeclareScope(ViewContext.ViewData, x, string.Format("{0}[{1}]", fullName, i++));
  4.     sb.Append((await context.GetChildContentAsync(false)).GetContent());
  5.    
  6. }

The TemplateHelper.DeclareScope helper basically put all scope information into an item of the Razor View ViewData dictionary, where the previously discussed Html.NextScope method can take it. The current scope contains the current model, and the HtmlPrefix to be added to all names. In our case Keywords[0]…Keywords[n]. This way all input controls will have names like “Keywords[i].Value”, instead of simply “Value”. This is necessary for model binding to work properly when the form is submitted.

When the scope is activated by Html.NextScope  the HtmlPrefix is temporarily put into the TemplateInfo.HtmlFieldPrefix field of the Razor View ViewData dictionary. This is enough to ensure, it  automatically prefixes all names. When the current scope is deactivated  the previous TemplateInfo.HtmlFieldPrefix value is restored.

In the next two sections i give all implementation details of both the scope stack , and of the <iterate> TagHelper.

Implementing the Scope Stack

We insert the Scope Stack code in a new folder. Go to the Web Project root and add a new folder called HtmlHelpers.

We start with the definition of an interface containing all scope informations. Under the previously created HtmlHelpers folder add a new interface called ITemplateScope.cs. Then substitute the scaffolded code with:

  1. using System;
  2. using System.Collections.Generic;
  3. using System.Linq;
  4. using System.Threading.Tasks;
  5. using Microsoft.AspNet.Mvc.ViewFeatures;
  6.  
  7. namespace IterateTagHelperTest.HtmlHelpers
  8. {
  9.     public interface ITemplateScope : IDisposable
  10.     {
  11.         string Prefix { get; set; }
  12.         ITemplateScope Father { get; set; }
  13.     }
  14.     public interface ITemplateScope<T> : ITemplateScope
  15.     {
  16.         Func<T> M { get; set; }
  17.     }
  18. }

The interface contains a generic that will be instantiated with the template model type. The model is returned by a function in order to get the right names inside the template (this way all names start from the first property after the function, see previous section). All members that do not depend from the generic are grouped into the not-generic interface ITemplateScope, the final interface inherit from. Moreover, ITemplateScope inherit from IDisposable since it must be used within a using statement. Together with the model the scope contains the current HtmlPrefix(see previous section), and a pointer to the father scope(this way, a template has access also to the father template model in case of nested templates).

Now we are ready to implement the Html.NextScope<T>   and TemplateHelper.DeclareScope methods. The whole implementation is based on an active scopes stack whose stack items are instances of a class that is declared private inside the TemplateHelper static class:

private class templateActivation
{
    public string HtmlPrefix { get; set; }
    public object Model { get; set; }
    public ITemplateScope Scope { get; set; }
}

The class contains the father HtmlPrefix to restore when the scope is deactivated, a not-generic pointer to the scope interface, and the scope model as an object since the model is not accessible through the ITemplateScope interface. The same class is used to pass scope information among method calls.

The DeclareScope method store new scope information in the ViewData dictionary

private const string lastActivation = "_template_stack_";


public static void DeclareScope(ViewDataDictionary vd, object model, string newHtmlPrefix)
{
    var a = new templateActivation
    {
        Model = model,
        HtmlPrefix = newHtmlPrefix
    };
    vd[lastActivation] = a;
}

Then NextScope<T> takes it to activate a new scope:

private const string lastActivation = "_template_stack_";
private const string externalActivation = "_template_external_";


public static ITemplateScope<T> NextScope<T>(this IHtmlHelper helper)
{
    var activation = helper.ViewContext.ViewData[lastActivation] as templateActivation;
    if (activation != null)
    {
        helper.ViewContext.ViewData[lastActivation] = null;
        var stack = helper.ViewContext.ViewData[templateStack] as Stack<templateActivation>;
        ITemplateScope father = null;
        if (stack != null && stack.Count > 0)
        {
            father = stack.Peek().Scope;
        }
        if (father == null)
        {
            father = helper.ViewContext.ViewData[externalActivation] as ITemplateScope;
        }
        return new TemplateScope<T>(helper.ViewContext.ViewData, activation)
        {
            M = () => (T)(activation.Model),
            Prefix = activation.HtmlPrefix,
            Father = father
        };
    }
    else return null;
}

If a newly created scope is found a new instance of the TemplateScope<T> class that implements the ITemplateScope<T> class is created. The TemplateScope<T> class is declared as private inside the TemplateHelper class. The stack is accessed just to find the father ITemplateScope. If the stack is empty the method try to get the father scope from another ViewData entry, that might be used to keep activation information across partial view calls(not implemented in this example).

The stack push is handled in the TemplateScope<T> constructor:

  1. public TemplateScope(ViewDataDictionary vd, templateActivation a)
  2. {
  3.     this.vd = vd;
  4.     a.Scope = this;
  5.     PushTemplate(a);
  6.  
  7. }

While the stack pop is handled by the TemplateScope<T> Dispose method:

  1. public void Dispose()
  2. {
  3.     PopTemplate();
  4. }

In order to add the whole implementation described above to your project, go to the previously created HtmlHelpers folder and add a class called TemplateHelper.cs. Then replace the scaffolded code by the code below:

  1. using System;
  2. using System.Collections.Generic;
  3. using System.Linq;
  4. using System.Threading.Tasks;
  5. using Microsoft.AspNet.Mvc.Rendering;
  6. using Microsoft.AspNet.Mvc.ViewFeatures;
  7.  
  8. namespace IterateTagHelperTest.HtmlHelpers
  9. {
  10.  
  11.     public static class TemplateHelper
  12.     {
  13.         private const string templateStack = "_template_stack_";
  14.         private const string lastActivation = "_template_stack_";
  15.         private const string externalActivation = "_template_external_";
  16.         private class templateActivation
  17.         {
  18.             public string HtmlPrefix { get; set; }
  19.             public object Model { get; set; }
  20.             public ITemplateScope Scope { get; set; }
  21.         }
  22.         private class TemplateScope<T> : ITemplateScope<T>
  23.         {
  24.  
  25.  
  26.             public TemplateScope(ViewDataDictionary vd, templateActivation a)
  27.             {
  28.                 this.vd = vd;
  29.                 a.Scope = this;
  30.                 PushTemplate(a);
  31.  
  32.             }
  33.             private ViewDataDictionary vd;
  34.             public string Prefix { get; set; }
  35.             public Func<T> M { get; set; }
  36.             public ITemplateScope Father { get; set; }
  37.             public void Dispose()
  38.             {
  39.                 PopTemplate();
  40.             }
  41.             private void PushTemplate(templateActivation a)
  42.             {
  43.                 var activation = new templateActivation
  44.                 {
  45.                     HtmlPrefix = vd.TemplateInfo.HtmlFieldPrefix,
  46.                     Model = a.Model,
  47.                     Scope = a.Scope
  48.                 };
  49.                 var stack = vd[templateStack] as Stack<templateActivation> ?? new Stack<templateActivation>();
  50.                 stack.Push(activation);
  51.                 vd[templateStack] = stack;
  52.                 vd.TemplateInfo.HtmlFieldPrefix = a.HtmlPrefix;
  53.             }
  54.             private void PopTemplate()
  55.             {
  56.                 var stack = vd[templateStack] as Stack<templateActivation>;
  57.                 if (stack != null && stack.Count > 0)
  58.                 {
  59.                     vd.TemplateInfo.HtmlFieldPrefix = stack.Pop().HtmlPrefix;
  60.                 }
  61.             }
  62.         }
  63.         public static void DeclareScope(ViewDataDictionary vd, object model, string newHtmlPrefix)
  64.         {
  65.             var a = new templateActivation
  66.             {
  67.                 Model = model,
  68.                 HtmlPrefix = newHtmlPrefix
  69.             };
  70.             vd[lastActivation] = a;
  71.         }
  72.         public static ITemplateScope<T> NextScope<T>(this IHtmlHelper helper)
  73.         {
  74.             var activation = helper.ViewContext.ViewData[lastActivation] as templateActivation;
  75.             if (activation != null)
  76.             {
  77.                 helper.ViewContext.ViewData[lastActivation] = null;
  78.                 var stack = helper.ViewContext.ViewData[templateStack] as Stack<templateActivation>;
  79.                 ITemplateScope father = null;
  80.                 if (stack != null && stack.Count > 0)
  81.                 {
  82.                     father = stack.Peek().Scope;
  83.                 }
  84.                 if (father == null)
  85.                 {
  86.                     father = helper.ViewContext.ViewData[externalActivation] as ITemplateScope;
  87.                 }
  88.                 return new TemplateScope<T>(helper.ViewContext.ViewData, activation)
  89.                 {
  90.                     M = () => (T)(activation.Model),
  91.                     Prefix = activation.HtmlPrefix,
  92.                     Father = father
  93.                 };
  94.             }
  95.             else return null;
  96.         }
  97.     }
  98. }

Now we are ready to move to the TagHelper implementation.

Implementing the <iteration> TagHelper

Go to the root of the web Project and add a folder called TagHelpers, then add a new class called IterateTagHelper.cs to this folder. Substitute the scaffolded code with the code below:

  1. using Microsoft.AspNet.Mvc.Rendering;
  2. using Microsoft.AspNet.Razor.Runtime.TagHelpers;
  3. using System.Text;
  4. using Microsoft.AspNet.Mvc.ViewFeatures;
  5. using System.Threading.Tasks;
  6. using System.Collections;
  7. using IterateTagHelperTest.HtmlHelpers;
  8.  
  9.  
  10. namespace IterateTagHelperTest.TagHelpers
  11. {
  12.     [HtmlTargetElement("iterate", Attributes = ForAttributeName)]
  13.     public class IterateTagHelper : TagHelper
  14.     {
  15.         private const string ForAttributeName = "asp-for";
  16.         [HtmlAttributeNotBound]
  17.         [ViewContext]
  18.         public ViewContext ViewContext { get; set; }
  19.         [HtmlAttributeName(ForAttributeName)]
  20.         public ModelExpression For { get; set; }
  21.  
  22.         public override async Task ProcessAsync(TagHelperContext context, TagHelperOutput output)
  23.         {
  24.             var name = For.Name;
  25.             var fullName = ViewContext.ViewData.TemplateInfo.GetFullHtmlFieldName(name);
  26.             IEnumerable model = For.Model as IEnumerable;
  27.             output.TagName = string.Empty;
  28.             StringBuilder sb = new StringBuilder();
  29.             if (model != null)
  30.             {
  31.                 int i = 0;
  32.                 foreach (var x in model)
  33.                 {
  34.                     TemplateHelper.DeclareScope(ViewContext.ViewData, x, string.Format("{0}[{1}]", fullName, i++));
  35.                     sb.Append((await context.GetChildContentAsync(false)).GetContent());
  36.  
  37.                 }
  38.             }
  39.             output.Content.SetContentEncoded(sb.ToString());
  40.  
  41.         }
  42.  
  43.     }
  44. }

Tag attributes are mapped to properties with the help of the HtmlAttributeName attribute, and are automatically populated when the IterateTagHelper instance is created. The asp-for attribute that in our case selects the collection to iterate on is mapped into the For property whose type is ModelExpression. As a result of the match a ModelExpression instance containing the collection, and its name is created.

The ViewContext property is not mapped to any tag attribute since it is decorated with the HtmlAttributeNotBound attribute. Instead it is populated with the Razor View ViewContext since it is decorated with the ViewContext attribute. We need the View ViewContext to extract the View ViewData dictionary.

The remainder of the code is straightforward:

  1. We get the name of the asp-for bound property.
  2. We add a possible HtmlPrefix to the above name by calling the GetFullHtmlFieldName method. We need it to pass the right HtmlPrefix to the scope of each IEnumerable element. Without the right prefix the collection can’t be bound by the receiving Action Method when the form is submitted.
  3. We extract the collection and cast it to the right type.
  4. Since we don’t want to enclose all template instantiations within a container we set the output.TagName to the empty string.
  5. We create a StringBuilder to build our content.
  6. For each IEnumerable element we create a new scope with the right HtmlPrefix, and the we get the element HTML by calling GetChildContentAsync. We pass a false argument to avoid that the method might return the previously cached string(otherwise we would obtain N copies of HTML of the first collection element).
  7. Finally we set the string created by chaining all children HTML as a tag content by calling the SetContentEncoded method. The Encoded postfix avoids that the string be HTML encoded.

Importing HtmlHelper and TagHelper

Now we need to import our Html Helper and our TagHelper. We may import them either locally in each View using them or globally by adding the import instructions to the Views/_ViewImports.cshtml View. Before the addition the Views/_ViewImports.cshtml file should look like this:

  1. @using IterateTagHelperTest
  2. @using IterateTagHelperTest.Models
  3. @using IterateTagHelperTest.ViewModels.Account
  4. @using IterateTagHelperTest.ViewModels.Manage
  5. @using Microsoft.AspNet.Identity
  6. @addTagHelper "*, Microsoft.AspNet.Mvc.TagHelpers"

Add:

@using IterateTagHelperTest.HtmlHelpers
@addTagHelper "*, IterateTagHelperTest"

To get:

@using IterateTagHelperTest
@using IterateTagHelperTest.Models
@using IterateTagHelperTest.ViewModels.Account
@using IterateTagHelperTest.ViewModels.Manage
@using Microsoft.AspNet.Identity
@addTagHelper "*, Microsoft.AspNet.Mvc.TagHelpers"
@using IterateTagHelperTest.HtmlHelpers
@addTagHelper "*, IterateTagHelperTest"

The @addTagHelper "*, IterateTagHelperTest" instruction imports all TagHelpers contained in the Web Site dll(whose name is IterateTagHelperTest).

Testing our TagHelper

No we may finally test our TagHelper. Opens the previously defined Views/Home/TagTest.cshtml View and replace its content with the content below:

@model IterateTagHelperTest.ViewModels.Home.TagTestViewModel
@using IterateTagHelperTest.ViewModels.Home
@{
    ViewBag.Title = "Tag Test";
}

<h2>@ViewBag.Title</h2>
<div>
    <form asp-controller="Home" asp-action="TagTest" method="post" class="form-horizontal" role="form">

        <iterate asp-for="Keywords">
            @using (var s = Html.NextScope<Keyword>())
            {
                var m = s.M;
                <div class="form-group">
                    <div class="col-md-10">
                        <input asp-for="@m().Value" class="form-control" />
                    </div>
                </div>
            }
        </iterate>
        <div class="form-group">
            <div class="col-md-offset-2 col-md-10">
                <button type="submit" class="btn btn-default">Submit</button>
            </div>
        </div>
    </form>
</div>

Now run the application, and click the “Test” main menu item to go our test page. You should see something like:
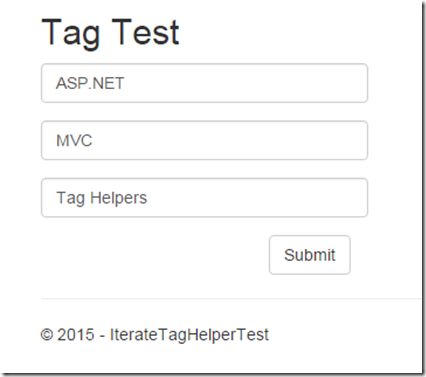
TestPage

The TagHelper actually instantiates the template all over the Keywords IEnumerable! The input field names appears correct:


Names

Let put a breakpoint in the receiving Action Method of the HomeController to verify that the IEnumerable is bound properly:
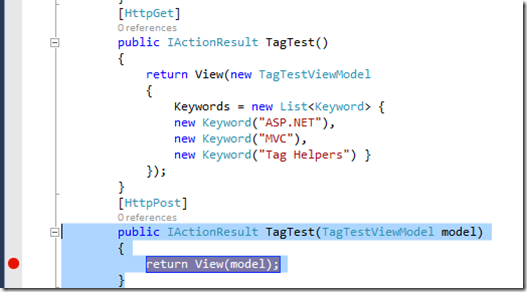
 

breakpoint


Now let modify a little our Keywords and let submit the form. When the breakpoint is hit let inspect the received model:


ModelBinding


That’s all for now! The whole project may be downloaded here.

Comments are disabled to avoid spamming, please use my contact form to send feedback:

Stay Tuned!

Francesco

Tags: , , ,

Oct 5 2015

Setup your VS 2015 Based Web Development Environment

Category: JavaScript | Asp.netFrancesco @ 06:17

This time we have a new option to develop and edit our code together with the last version of Visual Studio: Visual Studio Code. A lightweight code editor with both syntax highlighting and intellisense that supports more than 30 languages. It opens .Net development also to Mac and Linux systems, but it is a valid option to VS 2015 also in Windows systems since it opens as fast as notepad and enables you to make quick changes without waiting for VS 2015 initialization. Moreover, it connects easily with Git repositories and Visual Studio on line. Thus, I suggest to add both tools to your development environment. Both VS 2015 Community edition and Visual Studio Code may be freely downloaded here(you may find also further infos and documentation at this link).

The conversion from VS 2013 to VS 2015 is easier than previous migrations, really straightforward, so there are no drawbacks and no reasons for remaining tied to VS 2013.

It is convenient to move to VS 2015 also if you don’t plan to move to Asp.net 5/MVC 6 that are still in beta, since VS 2015 offers interesting enhancements also for old projects. Below I list some of them:

  • Useful suggestions next to errors
  • Performance infos on the line you are debugging. No need to launch performance specific tools to discover performance bottlenecks: you may discover them while you are debugging your application, since VS shows the computer time spent since your last debugging step(previous breakpoint or previous line if you are stepping) next to the line you are debugging. Moreover, on each line you have access to a performance window with several performance infos.
  • Native TypeScript support. In VS 2013, TypeScript compiler and intellisense were accessible through  an extension while in VS 2015 their support is native. However, also if TypeScript compiler is immediately available you have to run manually your compilation, or to write your script to run them automatically. Therefore, I recommend to install also Web Essentials where you may configure TypeScript files for being compiled automatically on project build, or on file save.
  • Require.Js and Angular.Js support (intellisense and error checking).
  • Node.Js support.
  • C# enhancements.

The list above is not exhaustive but collects just the more interesting features for web development. For more infos forrlow the documentation links here.


If you use Less(or Scss, JSX, ES6 and CoffeeScript), please notice that VS 2015 Less tools are not included anymore in Web essentials but in a different package.

OOOPSSs I forgot….If you need a repository and a development team support tool you may use a free 5 person Visual Studio On Line account.


Thus Summing up:

  1. VS 2015 and Visual Studio Code
  2. Web Essentaials 2015
  3. Node.Js tools for Visual Studio.
  4. Web Compiler extension (Less, Scss, JSX, ES6 and CoffeeScript).
  5. Visual Studio On Line account.


That’s all for now!

Enjoy ! In a short time a new series of posts about Asp.Net 5/ Mvc 6

Francesco

Tags: ,

May 7 2015

JavaScript Intensive Web Applications 4: JSON based Ajax and Single Page Applications

Category: WebApi | MVC | JavaScriptFrancesco @ 06:19

JavaScript Intensive Web Application 1: Getting JavaScript Intellisense

JavaScript Intensive Web Applications 2: Enhancing Html with JavaScript

JavaScript Intensive Web Applications 3: Enhancing Applications with Ajax

jsFarmIntellisense

In this last post of the series, I discuss the use of JSON based Ajax calls and client side View Models. I will propose also a simple implementation of a knockout.js binding to apply a generic jQuery plug-in to an Html node. The post is concluded with a short analysis of Single Page Application frameworks.

In my previous post we have seen that Html returning Ajax calls update the needed parts of an Html page while keeping unmodified the remainder of the page. This allow a  tighter interaction between user and server because the user may work on other areas of the page while waiting for a server response, and he/she may ask  supplementary information to the server when he/she is in the middle of a task without loosing the whole page state.

The user experience may be improved further if we are able to maintain the whole state of the current task on the client, because this way we reduce further the need to communicate with the server: the user may prepare all data for the server while receiving immediately all needed help and suggestions with no need to communicate with the server in this first stage. Communication with the server is needed only after everything has been prepared. For instance, the user may modify all data contained in a grid, recurring to a detail  window when needed. Entities connected with one-to-many relations with the main list may be edited in the detail view. Everything without communicating with the server! Then, when all changes have been done, the user performs a single submit, and updates the global state of the system. The server answer may contain corrections performed by the server to the data supplied by the user, that are automatically applied to the client copy of the data.

In other words maintaining the whole state of a task on the client side allows a tighter user-machine cooperation since this cooperation may be performed without waiting for remote server answers. However, the increased complexity of the client side requires a robust and modular architecture of the client code. In particular, since we move logics, and not only UI on the client side, Html nodes that are  mainly UI staffs must be supported by JavaScript models. Models and Html nodes should cooperate while keeping separation of concerns between logics and UI. This means that all processing must take pace on models that are then rendered by using client side templates. Accordingly, Ajax calls can’t return Html anymore, but must return JavaScript models.

Summing up, all architectures where the whole state of the current task is maintained on the client should have the following features:

  1. JSON communication with the server. The format of the data exchanged between server and client might be also Xml based, but as a matter of fact at the moment, the simpler JSON protocol is a kind of standard.
  2. Html is created dynamically by instantiating client templates, thus this kind of Web Applications are not visible to search engines.
  3. The state of client and server must be kept aligned, by performing simultaneous updates on both client and server in a transactional fashion. This means, for instance, that if a server update fails for some reason the client must be able to restore the state of the last client server synchronization.

As a matter of fact at the moment point 3 has not received the needed attention also in sophisticated Single Page Application frameworks, that don’t supply general tools to face it, so the problem is substantially left to custom solutions of the developers.

In the case of Html based Ajax communication we have seen that, since the communication is substantially based on form submits, the server relies on all input fields having adequate names to build a model that then is passed to the Action methods that serve the client requests. In JSON based commutations, instead,  input fields names are completely irrelevant since action methods receive substantially JavaScript models.

Html Ids, and CSS classes are also used as “addresses” to select Html nodes to enhance with JavaScript code.  Several frameworks like knockout.js and angular.js avoid the use of these ids and CSS classes as a way to attach JavaScript behavior to Html nodes. In their case, model properties are “connected” to Html nodes through the so called bindings that are substantially communication channels between Html nodes and the JavaScript properties that updates one of them when the other changes. They may be one-way or two ways. Bindings may also connect Html nodes with JavaScript functions, and the developer may also define custom bindings, thus bindings solve completely the problem of connecting Html nodes with JavaScript code with no need to provide unique ids, or selection-purpose CSS classes.

Below how to use a custom knockout.js binding for applying jQuery Plug-ins to Html nodes:


  1. <input type="button" value="my button" data-bind="jqplugins: ['button']"/>
  2. <input type="button" value="my button"
  3. data-bind="jqplugins: [{ name: 'button', options: {label: 'click me'}}]"/>


The binding name is followed by an array whose elements may be either simple strings, in case there are no plug-in options, or objects with a name and an option property. As you can see in knockout.js bindings are contained in the Html5 data-bind attribute.

Below the JavaScript code that defines the jqplugins custom binding:


  1. (function ($) {
  2.     function applyPlugin(jElement, name, options) {
  3.         if (typeof $.fn[name] !== 'function') {
  4.             throw new Error("unrecognized plug-in name: " + name);
  5.         }
  6.         if (!options) jElement[name]();
  7.         else jElement[name](options);
  8.     }
  9.     ko.bindingHandlers.jqplugins = {
  10.         update: function (element, valueAccessor, allBindingsAccessor) {
  11.             var allPlugins = ko.utils.unwrapObservable(valueAccessor());
  12.             var jElement = $(element);
  13.             for (var i = 0; i < allPlugins.length; i++) {
  14.                 var curr = allPlugins[i];
  15.                 if (typeof (curr) === 'string')
  16.                     applyPlugin(jElement, curr, null);
  17.                 else {
  18.                     applyPlugin(jElement,
  19.                         ko.utils.unwrapObservable(curr.name),
  20.                         ko.utils.unwrapObservable(curr.options));
  21.                 }
  22.             }
  23.         }
  24.     }
  25. })(jQuery)


The code above enables the use of all available jQuery plug-ins on all knockout.js based architectures, so that we can move to advanced client architectures based to knockout.js without renouncing to our favorite widgets and CSS/JavaScript frameworks like jQuey UI, Bootstrap, jQuery Mobile, and Zurb Foundation.


As a next step we may pass from storing the whole state of a single task, to storing the whole application state on the client side, which implies that the whole application must live in a single Html physical page(otherwise the whole state would be lost). Similar applications are called Single Page Applications.

In a Single Page Application Virtual pages are created dynamically by instantiating client templates that substitute the Html of any previous virtual  page in the same physical page. The same physical page may show simultaneously several virtual pages in different areas. For instance, a virtual page might play the role of master, and another the role of detail page.

Most of Single Page Application frameworks have also the concept of virtual link and/or of routing, and may connect the virtual pages to the browser history, so that the user may navigate among virtual pages with usual links and with the browser buttons.

But… why re-implementing the whole browser behavior inside a single physical page? What are the advantages of Single Page Applications compared to “multiple physical pages applications” based on Client View models?

In general having the whole application state on the client side reduces further the need to communicate with the server, thus increasing the responsiveness to the user inputs. More specifically:

  1. Once the client templates needed to create a new virtual page have been downloaded from the server further accesses to the same virtual page become very fast. On the contrary, loading a complex client model based page that is able to store the whole state of a task may be time consuming, so saving this loading time improves the user experience considerably.
  2. The state of a previously visited virtual page may be maintained so that the user finds the virtual page in exactly the same state he/she left it. This improves the cooperation between different tasks that are someway connected: the user may move forth and back between several virtual pages with the browser buttons while performing a complex task without loosing the state of each page.
  3. The same physical page may contain simultaneously several virtual pages in different areas. Thus, the user may move forth and back between several virtual page in one area, while keeping the content of another area. This scenario enables advanced form of cooperation between virtual pages.
  4. The whole Single Page Application may be designed to work also off-line. When the user has finished working the whole application state may be saved in the local storage and restored when he/she needs to perform further changes, or when he/she can go on-line to perform a synchronization with the server.

The main problem Single Page Application developers are faced with is keeping a large JavaScript codebase modular and maintainable.  Since virtual pages are actually client templates <-> ViewModel pairs, the concept of virtual page itself has been conceived in a way to increase modularity. However several virtual pages need also a way to cooperate that doesn’t undermine their modularity and the independence of each virtual pages from the remainder of the system.

In particular:

  1. Each virtual page definition should not depend on the remainder of the system to keep modularity, which, in turn, implies that virtual pages may not contain direct references to other external data structures.
  2. Notwithstanding point 1, some kind of cooperation that doesn’t undermine modularity, must be achieved among model-view pairs and among model-view pairs and the application models. A modular cooperation may be achieved by injecting interfaces that connect each model-view pair with the external environment as soon as a model-view pair is added to the page.
  3. Pointers, to data structures contained inside each virtual page should be either avoided or handled by resource managers to avoid they are used when a virtual page has been released or when it is not in an active state.

Separation is ensured someway by the concept of ViewModel itself. Durandal.js uses AMD modules to encode ViewModels. AMD protocol is a powerful technique for both loading dynamically and injecting other code modules that the current module might depend on and consequently for handling a large JavaScript codebase. However, the dependency tree is hardwired, so the injection mechanism is more adequate to inject code than dynamic data structures that might depend on the state of the ongoing computation. Accordingly, the full achievement of point 2) requires an explicit programming effort. Angular.js uses a custom dependency injection and module loading mechanism. That mechanism is easier to use, but it is less adequate for managing large codebases (in my opinion , not adequate at all). However, the fact that the injection mechanism is less structured make easier the injection of dynamic data structures when a model-view pair is instantiated.

In general most of frameworks ensure separation with some kind of cooperation, but no frameworks offer a completely out-of-the-box solution for point 2, and an out-of-the-box solution form managing the lifetime of pointers that have been injected into model-view pairs to ensure an adequate cooperation in the context of the ongoing computation (point 3). More specifically, the lifetime of pointers to AMD modules(or other types of dynamically loaded modules), that have been injected are automatically handled, but there is no out-the-of-the-box mechanism for managing pointers that a model-view pair might have to data structures contained into another model-view pair, so the developer has the burden of coding all controls needed to ensure the validity of each pointer, in order to avoid the use of pointers to data structures contained in model-view pairs that have been removed from the page.

The need for a more robust solution to problems 2 and 3 is among is among the reasons that pushed me to to implement a custom Single Page Application framework in the Data Moving Controls suite. The Data Moving SPA framework (see here, and here) relies on contextual rules that “adapt” each virtual page that is being loaded to the “current context”. Where the “current context” includes both interface implementations that connect the virtual page to the remainder of the system and information about the current state of the application, such as, if the user is logged or not, the current culture (that is the browser language and culture settings), and so on. Contextual rules are used also to redirect a not logged user to a login virtual page and to verify if the user has the needed authorizations to access the current virtual page. The interface implementations passed by the contextual rules to the virtual page View Models include also all resource managers needed  for  sharing data structures among all application virtual pages safely. Another communication mechanism is the possibility to pass input data to any page that is being loaded. Such input data are analogous to the input data passed in the query string. In fact, this input may be included also in virtual links.

Another big challenge of Single Page Applications is the duplication of code in both client and server side. In fact, the same classes, input validation criteria, and other metadata must be available on both client and server side, and when the languages used by the two sides are different, this become a big problem. The Meteor framework uses JavaScript on both server and client, and allow code sharing between the two sides. The main  price to pay for this solution is the use of a language that is not strongly typed also on the server side.  In the Data Moving SPA we faced this problem by equipping SPA server with dynamic JavaScript files implemented with Razor views. This way JavaScript data structures may be obtained by serializing in JavaScript their equivalent .Net data structures.

Another important problem all SPA must solve is the data synchronization between Client and Server. Durandal.js works quite well with Breeze.Js that offers some synchronization services for the case the server may be modeled as an OData source. Breeze.Js may be adapted also to most of all other SPA framework, but this solution is acceptable only if there is almost no business logics between the client and the server side database. In fact, only in this case the server API may be exposed as an OData source only, with no need of more complex communication. 

Meteor,  takes care of sever/client synchronization in a way that is completely transparent to the developer. A similar solution facilitates the coding of simple applications, but may be inadequate for complex business systems that needs to control explicitly communication between client and server.

The Data Moving SPA framework offers retrievalManagers to submit a wide range of (customizable) queries(that includes also OData queries)  to the server, while viewModelUpdatesManagers and updatesManagers take care of synchronizing a generic data structure with the server in a transactional fashion, by taking into account both changes in several Entity Sets (additions, modifications, and deletes), and changes in temporary data structures(core workspaces). As a result of the synchronization process they may return either errors that are automatically dispatched in the right places of the UI, in case of failure, or remote commands that apply modifications to the client side data structure to be synchronized with the server. While the synchronization process is completely automatic, the developer has full control on which data to synchronize, and when to synchronize them, and also the possibility to customize various part of the process.


That’s all! This post ends the short series about JavaScript intensive web application. This series is no way a tutorial that describes extensively all details of the techniques that has been discussed, but just a guide on how to select the right technique for each application and on how to solve some architectural issues that are not usually discussed in other places.


Stay tuned! 

Francesco

Tags: , ,